How-To Guide
Home and property owners around the nation -- and indeed the world -- are installing vinyl fences. The reasons are many. PVC boasts a natural elegance not found in materials such as chain link. It's a low-maintenance material, requiring less upkeep than wood. When procured from the highest quality inventory available, vinyl is perpetually UV- and rust-resistant and has the capacity to last a lifetime. When it comes to suppliers of vinyl fence products, American Vinyl Works is your premier destination. DIY homeowners and contractors alike seek our expertise and products when planning vinyl fences, decks, railings, and custom items.
GETTING STARTED:
Requesting the location of buried utilities is important before you undertake any digging or excavation work on your property to avoid damaging utility lines, which can be dangerous and costly. To request the location of buried utilities, follow these steps:
Contact Your Local One-Call Center:
In the United States, you can contact a One-Call Center to request utility line location services. Each state typically has its own One-Call Center, which acts as a liaison between you and utility companies. You can find the contact information for your local center online or by calling 811, a national "Call Before You Dig" number.
Provide Necessary Information:
When you contact the One-Call Center, be prepared to provide specific information about your excavation project. This information may include:
- Your name and contact information
- The address of the excavation site
- The type of work you plan to do (e.g., digging a trench, installing a fence, planting trees)
- The start date of your project
- The area you plan to excavate, including the boundaries
Wait for Confirmation:
After you submit your request, the One-Call Center will notify the relevant utility companies in your area about your project. They will dispatch technicians to mark the locations of underground utility lines, typically within a few business days.
Meet with Technicians:
When the utility technicians arrive at your property, they will use various methods to mark the locations of buried utilities. This may involve using paint, flags, or physical markers to indicate the presence and path of utility lines.
Respect Markings and Guidelines:
Once the utility lines are marked, it's essential to respect the markings and guidelines provided by the technicians. Do not dig or excavate within the marked areas. Exercise caution and hand-dig if you must work near the marked lines to avoid damaging them.
Plan Your Excavation:
Use the marked lines as a guide to plan your excavation project safely. You may need to adjust your project's location or depth based on the marked utilities. Always follow safe excavation practices.
Report Emergencies:
If you accidentally hit a utility line during your excavation work or if you suspect a gas leak, electrical hazard, or other emergency, immediately call 911 and the utility company responsible for the affected line. Safety should always be the top priority.
By following these steps and requesting the location of buried utilities through your local One-Call Center, you can ensure a safer and more successful excavation project while avoiding damage to utility lines.
What is a Private Utility?
A private utility refers to a utility service provided by a private contractor, and it can be installed both during the initial construction of a facility or at any point during facility improvements. These utilities encompass services such as electricity, gas, cable, telephone, sewer, and water. In the case of electricity, the private utility typically originates at the facility's transformer and extends to the roughed-in area within the building. The transformer, often recognized as the "big green box," is commonly situated on the street side or front of commercial property. However, this description primarily pertains to the initial private electrical utility. For other utilities, determining the point where the private utility begins requires further investigation.
What are examples of private utilities?
One of the most prevalent private utilities is electricity used for facility lighting, which includes illuminating parking lots. Additionally, electricity, gas, cable, and other services may be extended from a primary building to a secondary on-site building. Gas is often utilized for outdoor grills and accent torches at entrances, while phone and internet connections may be established for remote buildings.
What does "private locate" mean?
A private locate refers to the process of identifying and marking private utilities. This task is not performed by the One Call System because they do not maintain records of these utilities. The responsibility for identifying private utilities rests with the facility owner and, potentially, the contractor responsible for the initial construction. Unlike public or One Call locates, there are no established regulations or standards governing private locates. The method of marking private locates should be agreed upon by the locator and the contractor involved to prevent confusion with other construction site markings, such as survey stakes and post hole locations.
Who is responsible for conducting private locates?
Private locates may be conducted based on as-built records, the memory of individuals familiar with the facility, or by an electrician with the necessary expertise to tap into the electrical service. It is essential that the method of locating private utilities is determined through an agreement between the locator and the individual responsible for installing any structures like fences.
What level of accuracy can be expected from private locates?
The accuracy of private locates varies widely as there are no established standards governing their precision. This means that the accuracy can range from being spot-on with the utility's location to being entirely off.
How can one ensure that private locates are carried out correctly?
The contractor undertaking future work should make a written request for all private utilities to be located before commencing the work. This request should also include written confirmation that the locates are complete and should be reviewed before commencing any construction.
What information should be included in a request for private utility locates?
The request should specify the anticipated start date of the work and request that the utilities be located at least twenty-four hours in advance of the work or within a reasonable timeframe that allows for review. The request should also stipulate that locates be marked using a color-coded identification system and placed with an 18-inch variance from either side of the mark, in accordance with One Call System standards. Additionally, it should state that the contractor will not be held responsible for any damages to non-located or mis-located utilities during construction. Lastly, the request should demand that the owner or their representative inform the contractor in writing about the presence and location of private utilities.
What should be done if a private utility is damaged during construction?
In case a private utility is damaged, it is advisable to follow the existing One-Call Notification procedure for damaged utilities. This approach helps ensure that the utility is not a public utility and reduces potential future liabilities.
Measuring your yard accurately is crucial when you're buying fencing materials to ensure you purchase the right amount of materials and avoid unnecessary expenses. Here's a step-by-step guide to help you measure your yard for fencing:
Tools You'll Need:
- Measuring tape or a long tape measure
- Paper and pencil or a notepad
- Graph paper or a yard diagram (optional but helpful)
Step 1: Prepare Your Tools and Materials:
Gather your measuring tools and some paper or a notepad to record your measurements. If you're comfortable with it, creating a diagram of your yard can be helpful for visualizing the fencing layout.
Step 2: Define the Fence Layout:
Decide on the type of fence you want and plan the layout. Determine where you want the fence to start and end, as well as any gates or other features you want to include.
Step 3: Measure the Perimeter:
Start by measuring the perimeter of your yard. Walk around your property line and use the measuring tape to record the distances between key points. For accuracy, measure from the inside edge of any existing fences or structures. If you're using a yard diagram, mark down each measurement on it.
Step 4: Account for Gate Openings:
Measure the width of any gates you plan to install and subtract this from the total length. Gates are typically 3 to 5 feet wide, depending on their purpose.
Step 5: Account for Posts:
Depending on the type of fence you choose, you'll need to account for the space between posts. Common spacing is between 6 to 8 feet, but this may vary based on the fence type and local building codes. Calculate how many posts you'll need and add their width to your measurement.
Step 6: Calculate the Amount of Material:
Once you have the measurements, you can calculate the amount of fencing material you need. If you're buying pre-made panels or rolls of fencing, check the product specifications to determine how much linear footage is covered per panel or roll. Then, divide the total linear footage needed by the coverage per panel or roll to get the number of panels or rolls required.
Step 7: Add Extra for Waste:
It's a good idea to add a small percentage (usually 5-10%) to your calculated material quantity to account for waste, mistakes, and future repairs. This extra material ensures you have enough in case you encounter unexpected issues.
Step 8: Consult Local Building Codes:
Before purchasing your materials and installing the fence, check with your local government or homeowner's association to ensure you comply with any regulations, codes, or permits required for fence installation in your area.
By following these steps and being meticulous with your measurements, you can accurately determine how much fencing material you need to enclose your yard.
American Vinyl Works offers many fast and easy tools to help guide you in purchasing the right fence for your yard. Two of the most popular options are the Draw My Fence tool and Complete Fence Packages. Please visit the Quote Center from the top navigation of this site to view all the options to get you started.
Draw your vinyl fence and purchase all the necessary fence parts using our free online drawing tool! It only takes a couple of minutes, and four easy steps.
1. Pick out a fence style and color.
2. Look up your address on Google Maps or use a blank canvas.
3. Draw an outline for your fence around your property.
4. Click "Add to Cart."
Once your drawing's complete, the tool automatically calculates and then adds posts, railings, and other essential parts to your cart. Save the time and expense of physically taking yard measurements!
The Complete Fence Packages concept came from wanting to provide a simple, fool proof way to purchase all the fencing parts needed to build a fence to fit anysize yard. We call it the easy button for the customer. This has quickly become a great tool for contractors with multiple jobs and homeowners alike. Quickly order everything you need to build your fence in one click!
We understand that buying a new fence can be an expensive investment. We have partnered with ShopPay to allow customers access to financing options.
At checkout, you can choose to pay in full with credit card of your choice or select a ShopPay payment plan that best fits your budget. American Vinyl Works is not affiliated with ShopPay financing, you will have to agree to their financing terms. ShopPay does charge interest, so make sure to review all the terms before accepting this option.
When placing an online fence order, please allow 10-12 business days for us to process and package your order. In the case of any custom fabrication, Complete Fence Packages (full yard orders) that include a vinyl gate, kindly allow up to 21 business days for processing.
When you order fence materials online, especially for larger quantities or bulk orders, you may expect a delivery process that involves a freight truck. Here's what you can expect, including considerations for offloading and storage:
Freight Truck Delivery:
In the case of bulk fence material orders, a freight truck will likely be used for delivery. Freight trucks are equipped to handle larger and heavier shipments.Delivery Notification:
You should receive a notification, which may include a phone call or email, from the shipping company to schedule the delivery date and time. Be prepared to provide information about your availability and any specific delivery instructions.Offloading Considerations:
When the freight truck arrives, you'll typically need to offload the materials yourself. This is often a requirement when using freight shipping. Make sure you have the necessary equipment or labor to handle this, as fence materials can be heavy and bulky. Some suppliers may offer a liftgate service for an additional fee, which can lower materials to the ground from the truck. If available, you can consider this option to make offloading easier.Flat Storage Area:
You'll need a flat and accessible area to store the materials. Ensure the storage location is level, stable, and free from any potential hazards that could damage the materials. Keep in mind that fence materials can be large and unwieldy, so having a well-organized storage area will make it easier to locate and use the materials when you're ready to install them.Inspection:
After offloading, it's important to inspect the materials for any damage during transit. If you find any issues, document them and contact the supplier immediately to address the problem.Installation Planning:
Once you've offloaded and inspected the materials, you can begin planning your fence installation. Follow the installation guidelines provided by the American Vinyl Works or consult with our trained staff if needed.It's crucial to communicate with the shipping company and supplier regarding any specific delivery instructions and requirements, such as offloading, to ensure a smooth delivery process. Additionally, be prepared for any additional fees associated with special services like liftgate delivery.
FENCE INSTALLATION:
Regrettably, many public utility companies often position their utilities close to or along property lines to minimize costs and avoid interference with buildings. However, most property owners, whether for businesses or homes, prefer to install their fences along their property boundaries to encompass their entire property within the fence lines.
For any project involving excavation or ground disturbance, it is imperative to conduct utility locates through the One-Call system. You must reach out to this agency and inform them of your digging intentions and location. In response, they will mark the actual buried utilities within a 36-inch zone (18 inches on either side of the marked line) using specific colors for each utility:
- Red | Electricity
- Yellow | Gas
- Orange | Telephone
- Blue | Water
- Green | Storm or sewer
- Pink | Survey
The One-Call system will provide you with a locate number and a designated time for safe digging commencement. Ensure you obtain this locate number from your designated contact person as part of your project preparation. The One-Call system will then notify all utility providers in the area of your excavation plans, prompting them to mark their utilities within your intended work area. If you reach the site and find no utility markings, it is likely that the project was not located correctly. In such cases, promptly contact the One-Call system to confirm the site's proper location.
When establishing your fence line, you may come across utility locate marks. Your first approach should be to try and install your fence without altering its position and encroaching within the 36-inch boundary. If this proves unfeasible, you will need to carefully probe for the utility's location, hand-dig a few inches, and then probe again. Repeat this process until you reach the appropriate depth of the utility. It is strongly recommended to avoid digging around electrical or gas utilities entirely and consider relocating the fence instead.
It's important to recognize the substantial risks associated with digging around buried utilities. People have lost their lives when attempting to dig around electrical service lines with hand tools, and others have suffered permanent injuries and disfigurement. Your safety should be a top priority when working near buried utilities.
String line represents the outer edge of your fence and not its center. In point of fact, the string line most likely represents the location of the fence fabric.
-
1. Install stakes marking corner, end, and changes in grade at intervals not exceeding 200 feet. Install the stakes true and no more than 6" above the grade. Stakes must be at least 18” long to ensure proper burial; proper burial ensures the stakes don’t move during the installation process. Failure to install stakes at changes in grade will result in string line several inches or feet above the grade, being held tight to the ground, or being caught on plants or curbs. The results can disrupt your fence’s alignment. Hammering stakes clear of post holes helps prevent the stakes from being disturbed during the digging process.
2. Run the string on the outside of where the fence will be installed—in other words where the vinyl fabric will be located. At corners, create a triangle using the string and continue to run the string without cutting it.
3. Run the string through the gate openings to assure proper alignment from one side to the other.
4. Keep the post a 1/4" off the string to avoid pushing the string out of alignment.
Every vinyl fence project comes with detailed fabrication drawings delineating fence height, width, and materials used in assembly. All the materials shipped from American Vinyl Works are carefully designed and fabricated in accordance with the information in these drawings. It is important, during installation, not to stray from this drawing, as you'll end up with scrap material. Set your vinyl fence posts according to the dimensions specified in the drawing you receive. Obtain the fence fabrication drawings before commencing the vinyl fence installation process. Said drawing contains not only information regarding post spacing but also post height above the grade.
Obtain three posts setting jigs. These jigs are typically made from 2' x 4"s and feature slits wider than the vinyl post’s wall thickness at the end. The dimension between these two slits should equal the inside of the post dimension indicated on the fabrication drawing.
Mark the post according to your fabrication drawing. Use a tape measurer to determine and mark locations for vinyl post holes. Ensure the tape is taut between each hole location and take time to ensure accuracy. Accuracy is important: the layout must be exact to + 1/4". At this point, use small nails or pins to mark post locations. Refrain from using paint marks, which are too broad and make determining centerline marks difficult.
Except in situations when trying to obtain evenly spaced sections, full panels should be laid out along each stretch. The last panel will be a partial panel. Should this result in something unsightly, go back one full panel and split the difference. Example when you have a last panel that’s two-foot and the typical panel is eight-foot. Go back one full panel and compromise with a pair of five-foot panels.
Once the holes have been dug, slide the first post into concrete footing. Slide the second post halfway into the concrete footing. Before the second post is all the way down, place the jig between the two posts. To do so, slide the jig into the bottom hole of each post where the rail is to be located.
Slide the jig's end into the hole. Lock it in place so that the jig's notch saddles the rail route’s bottom edge. Now slide the second post all the way into the concrete footing. Repeat the process with the second, third, and fourth vinyl posts. Jigging the posts helps achieve absolute accuracy. Three jigs help ensure that, when leveling up the final post, we don’t pull each adjacent post out of plumb.
What information do I need to get after setting ornamental and vinyl posts?
After setting your posts, create an as-built that illustrates the following:
-
1. Every post set. Show each post as a square.
2. Every full panel bay. Illustrate with "FP"
3. Any partial panels, provide inside to inside dimensions.
4. Any slopes greater than 3 degrees with slope dimension drawn between the posts.
5. Inside to inside gate dimensions with any slope dimensions as previously illustrated in Lesson 3.
Vinyl fencing, being a rigid form of plastic, presents unique challenges when it comes to cutting. Attempting to cut it with a standard wood blade can lead to several issues. Firstly, the material may crack and pop around the blade, resulting in a jagged edge with pits and cracks along the cut. Even more concerning, this method poses a significant safety risk, as vinyl pieces can shatter and fly, potentially causing eye injuries or severe cuts.
To ensure a clean and safe cut, it is best to use a blade specifically designed for cutting plastics. These blades typically have smaller teeth spaced closely together, providing more control and reducing the likelihood of splintering or shattering.
In cases where you need to cut a pocket for a profile or make adjustments for a slope, consider using a Dremel or a Roto-Zip type tool equipped with an abrasive or plastic-cutting tip. Always secure a straight edge firmly to the material and guide the tool along it when making cuts. These high-speed tools are challenging to control by hand, and even a slight deviation in your cut can be noticeable, so using a guide is essential for precision and safety.
When you're dealing with sloping terrain while installing a vinyl fence, it's important to be prepared for adjustments in your post pockets, rail pockets, and picket lengths. Typically, a standard vinyl fence can accommodate a slope of up to 5%. Beyond that, you'll need to follow these field adjustments:
Begin with Rail Pockets:
Try to install the rails between the posts initially.
For Severe Slopes:
1. In cases where the slope is so steep that standard post pockets won't work, place the rail parallel to the existing grade and flush it along the side of the post.
2. With the rail in place, use the post as a guide and mark a line down the height of the rail.
3. Measure this line, as it represents the height of the rail pocket required to insert the rail.
4. Use a straight edge to draw the taller pocket along the existing rail pocket.
5. Carefully and accurately cut the larger pocket into the post using a Roto-Zip. Make sure to clamp a straight edge to guide the tool for a straight cut.
Adjusting for Pickets:
1. If you have a picket fence, slide the rail through the top rail into the bottom rail.
2. If you can't keep the picket plumb, you may need to field cut the bottom of the top rail to accommodate the slope.
3. Align the picket with the top hole and make sure it is plumb.
4. Mark on the bottom of the top rail where the picket needs to come through to be plumb.
5. Use your Roto-Zip to cut a larger picket hole in the rail to accommodate the plumb picket.
6. For solid fences using tongue and groove pickets, you'll need to cut the pickets to suit the slope.
7. Trim each edge of the picket with a Roto-Zip or a Skilsaw equipped with a plastic blade.
For Extreme Slopes:
In the case of a severe slope where one edge of the picket remains exposed, you may need to use full-length materials and custom cut each picket to fit the specific slope. Handling slopes during vinyl fence installation requires precision and careful adjustments to ensure your fence looks good and functions properly on uneven terrain.
Building a picket fence is a straightforward fencing project, but it's essential to follow these critical steps to ensure your fence remains sturdy and durable. Neglecting these instructions may lead to future repairs or replacement.
Rail Installation:
1. Ensure both ends of the rail are notched fully.
2. Insert the notches of the rail into the post and secure them on the inside of the post to prevent the rail from slipping out. Neglecting this can result in the rail sliding out over time.
Picket Placement:
1. Verify that both ends of the picket have full notches.
2. Slide the picket through the top rail and into the bottom rail, securing it in place.
3. Gently tug on the picket to confirm it won’t come loose. If it does, re-notch the picket as needed.
To build a solid or closed-top fence, follow these steps:
1. Begin by installing the bottom rail in a manner similar to that of picket fences. This provides the foundational structure.
2. Now, the procedure diverges from a typical fence installation:
3. Install one side of the top rail securely.
4. Insert your first picket on the same side where you've just installed the top rail.
5. Lower the rail gently on top of the picket, effectively locking it in place.
6. Continue this process with the rest of the pickets, ensuring each one is securely held in position by the top rail.
Lattice panels are typically available in 4' x 8' sheets, and they need to be customized to fit your chosen fence style. Here's a step-by-step guide for installing lattice:
1. After you've completed the installation of the rails and pickets, position your lattice panel between the posts, ensuring it runs parallel to the top rail.
2. Use a pencil to trace along the edge of the post onto the lattice.
3. Cut the lattice along the marked lines using a skilsaw or a similar cutting tool.
4. Insert the cut lattice piece into the bottom rail, making sure it fits snugly.
5. Similar to the process of installing pickets, place one end of the top rail into the post and slowly lower the rail, allowing the lattice to slide into the rail slot. This secures the lattice panel in place.
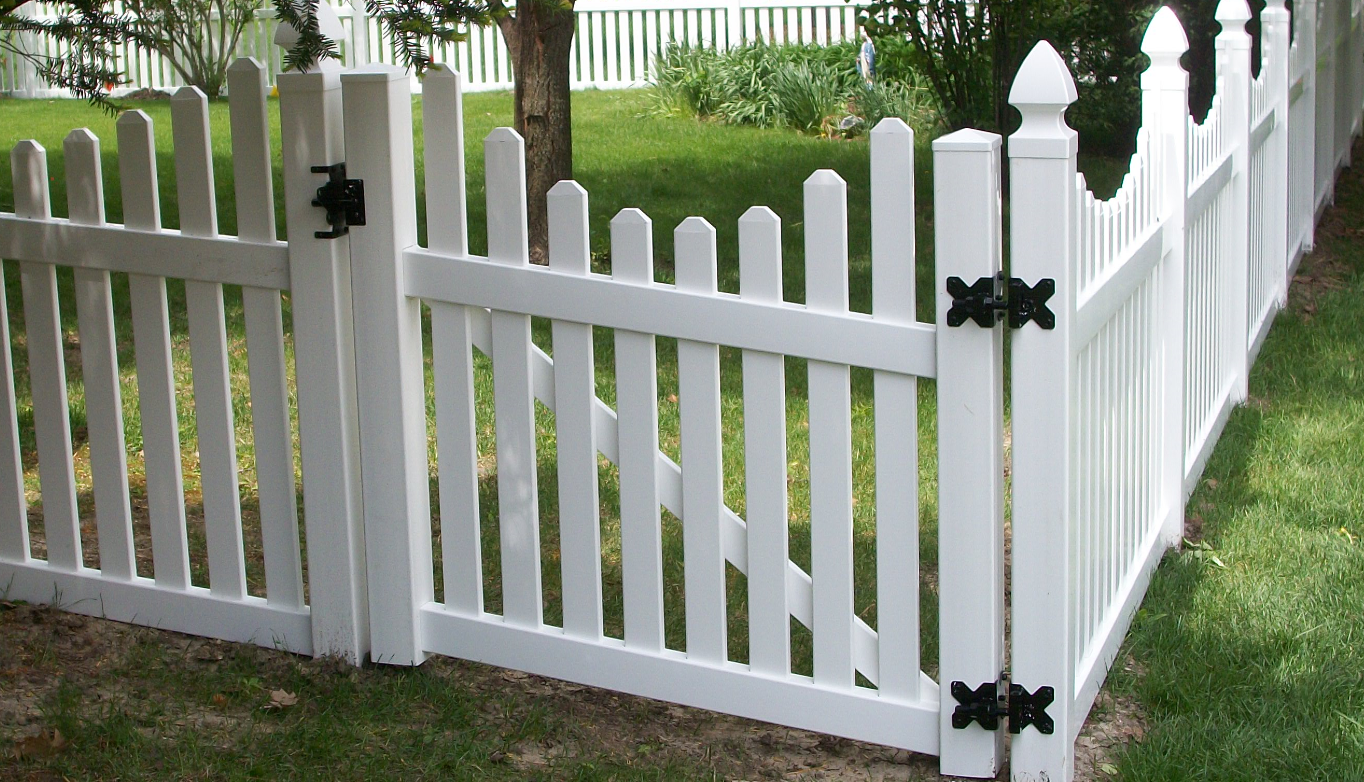
To hang a vinyl fence gate, follow these steps:
1. All vinyl gates are attached to vinyl gate posts, which contain a steel insert. This insert, shaped like an angle, covers two sides of the post for structural support and to allow hinges to be attached securely.
2. When setting your hinge post, ensure that one leg of the steel insert faces the gate's opening, while the other leg faces the side where the gate will swing outward.
3. Screw your gate hinges onto the gate post at a distance of approximately 6 inches from both the bottom and the top of the post. Take care not to over-tighten and strip the material.
4. Attach the other end of the hinges to the gate frame. Ensure they are securely fastened.
5. Fine-tune the gate’s alignment by adjusting the nuts on the side of the gate post where the hinges are attached. This adjustment allows you to achieve the desired gap spacing for your gate.
6. Attach the gate latch to complete the installation.
By following these steps, you can successfully install a vinyl fence gate on your fence.
NEED EXPERT HELP?
The personnel at American Vinyl Works have transformed careers into passions. These are not run of the mill 9-to-5 staffers. These are industry experts who know vinyl fencing inside and out, and who can answer all your questions. To meet the high standards set by our customers, our designers and fabricators have undergone extensive training in all aspects of their profession. Do you want consultation on fence design? Not sure which type of fence -- privacy, semi-private, picket, etc. -- is right for your home or business? Interested in purchasing fence materials but have questions about installation and assembly? Our team is ready to answer your questions! Contact Us Today!